Weed Manager User Guide
Weed Manager – the tool for taking control of pest plants. Track weed locations, control measures and document outcomes over time.
- Creating an account
- Editing account details
- Working with projects
- Deleting your project
- Using the map tools
- Managing weeds and work areas
- Adding a weed to be managed
- Using work areas
- Selecting a weed for action
- Using a Work area to select weeds for an action
- Adding a feature
- Adding a track
- Checking a control
- Recording work hours
- Member management
- Using the App
- App overview
- Adding a weed or feature
- Adding a control or check
- Using the GPS to record weed locations and add a control
- Privacy Policy
- Data deletion
- Map feeds
Creating an account
- Go to weedmanager.nz and register a new account:
- Enter your email address and username.
- Answer the CAPTCHA question.
- Click the Create new account button
- A welcome message with further instructions will be sent to your email address.
- Check your email for a the welcome message from WeedManager (
- If the message hasn't shown up within a few minutes, check your spam folder!
- Open the email and click the link (or copy and paste it into your browser) to verify your account.
- You will be automatically logged into WeedManager
- On your account page you can set a password.
- Once you have set the password you will see a screen like this:

Editing account details
You can update your Weedmanager account details, such as your email address, password, username and contact details.
- Click on "My Account" on the menu bar.


2. A form will load where you can update whatever account details you want to change.
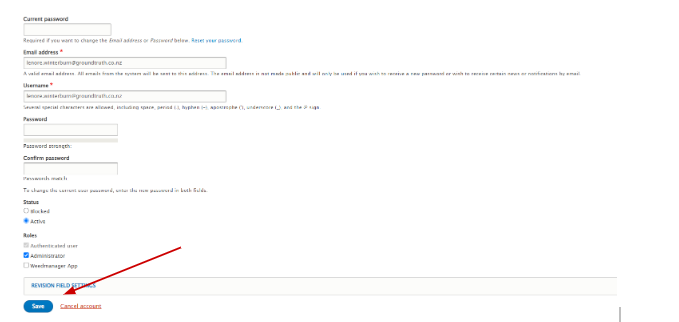
3. Click the blue "Save" button at the bottom of the form to save your changes.
Working with projects
Projects describe the group of people who are working together to manage weeds in a geographical region.
Joining a project
- Click Find projects in the top menu (or click the green Find a project to join button at the bottom of the My projects page).
- To search for a project you can either:
- Search for a project using the Project name contains … text box beneath the map, or
- Use the map to zoom to an area of the map. All public projects will show on the map. Click on the project area and the name will popup.
- Click on the name of the project to go to the projects page.
- Click the orange Request Membership button to contact the administrator of the project.
- Optionally add a message (for example, who you are if the administrator won’t recognise your email address).
- Click the green Confirm button. An email will be sent to the administrator of the project.
- You will be notified when the request has been approved and the project will appear under the My projects menu.

Creating a new project
- Click the Add a project button near the bottom of the My projects page
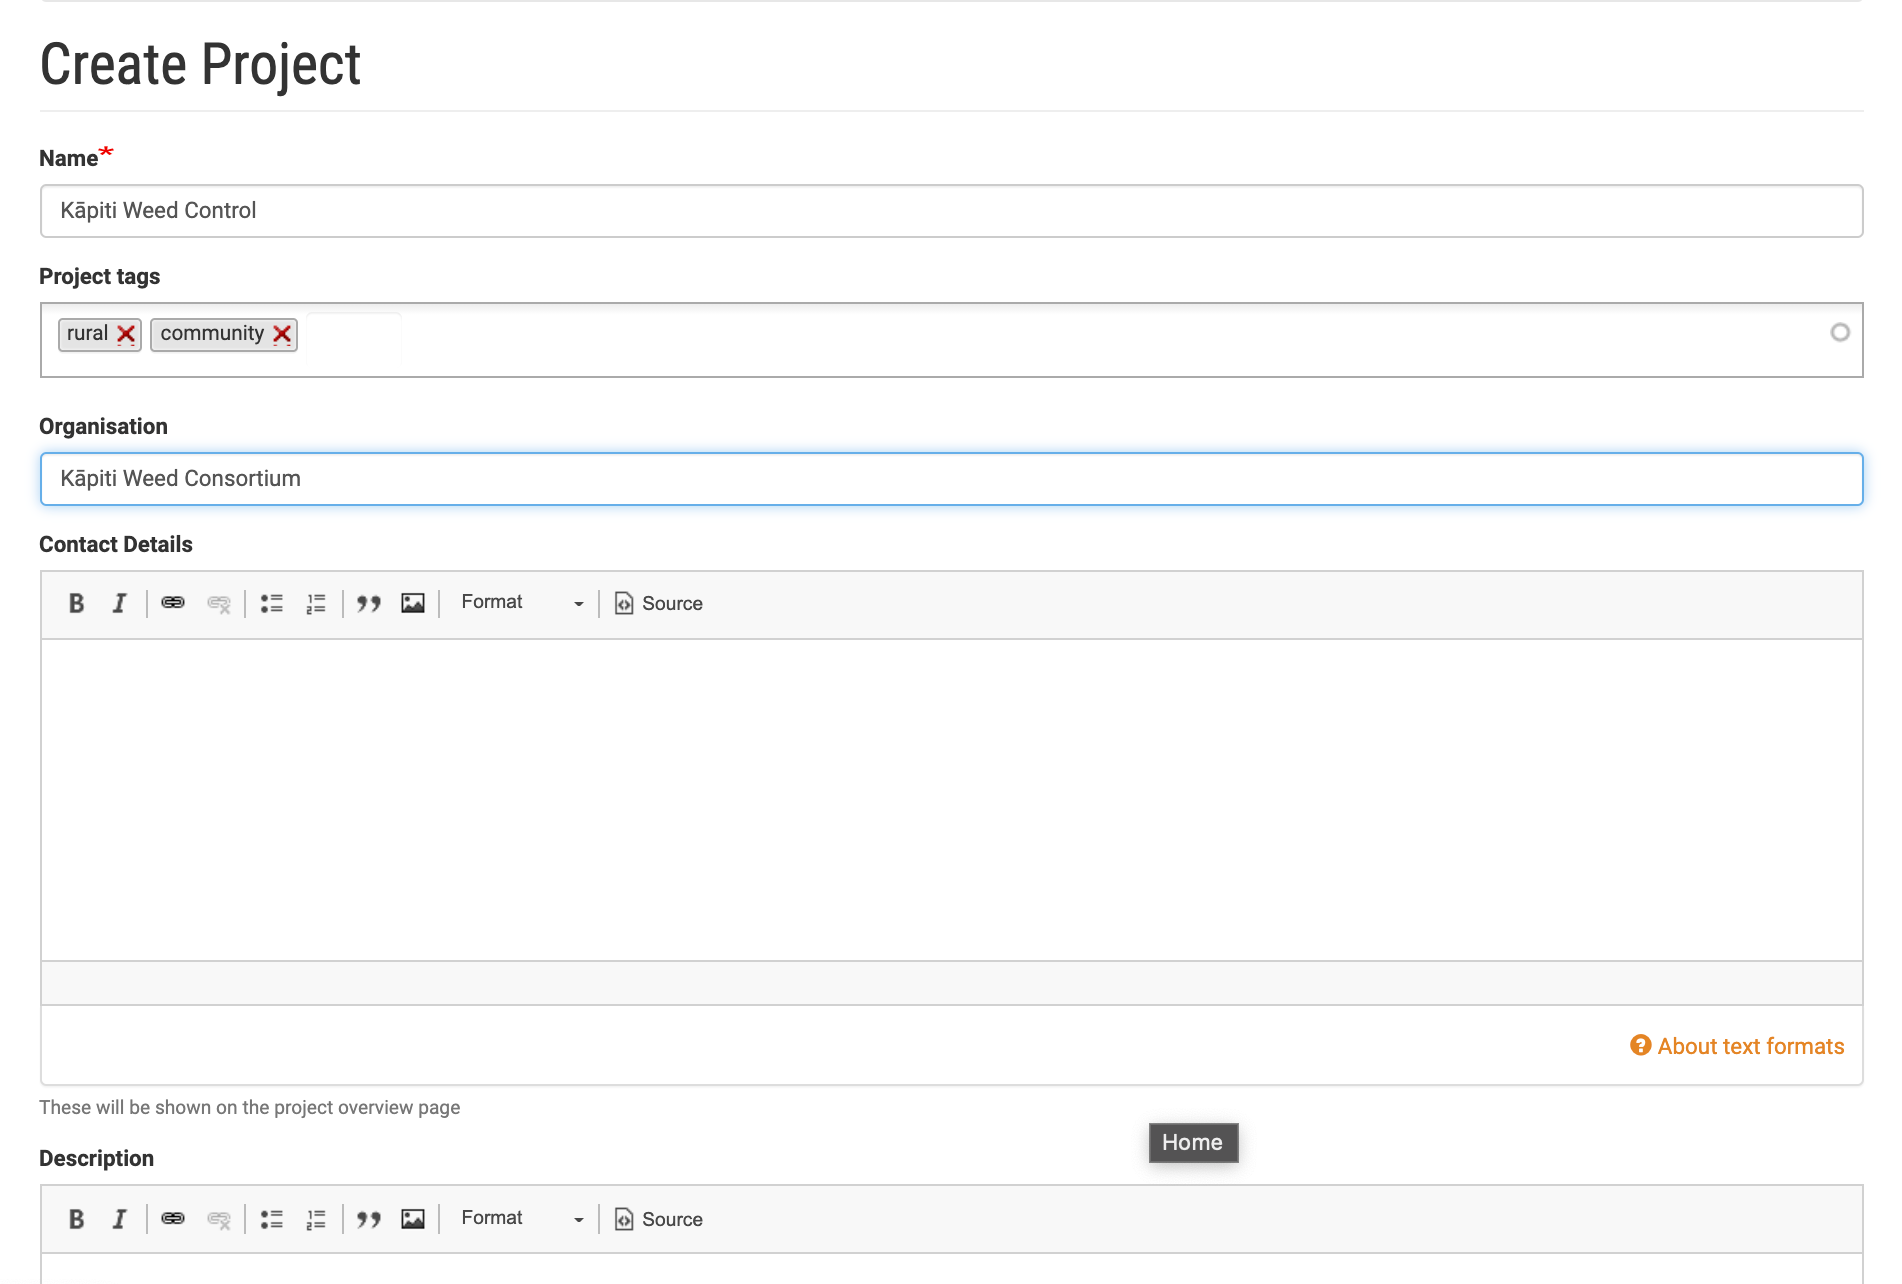
- Fill out the form with the details for your project. Fields marked with a * are required:
- Name - choose any name to identify your project.
- Project tags - if you have a number of projects these can be helpful to group your projects. For example “reserve”,”riparian”, etc. Press enter after typing each tag.
- Organisation, Contact details, and Description - providing as much information as possible will make it easier for others to find your project if you choose to list your project publicly.
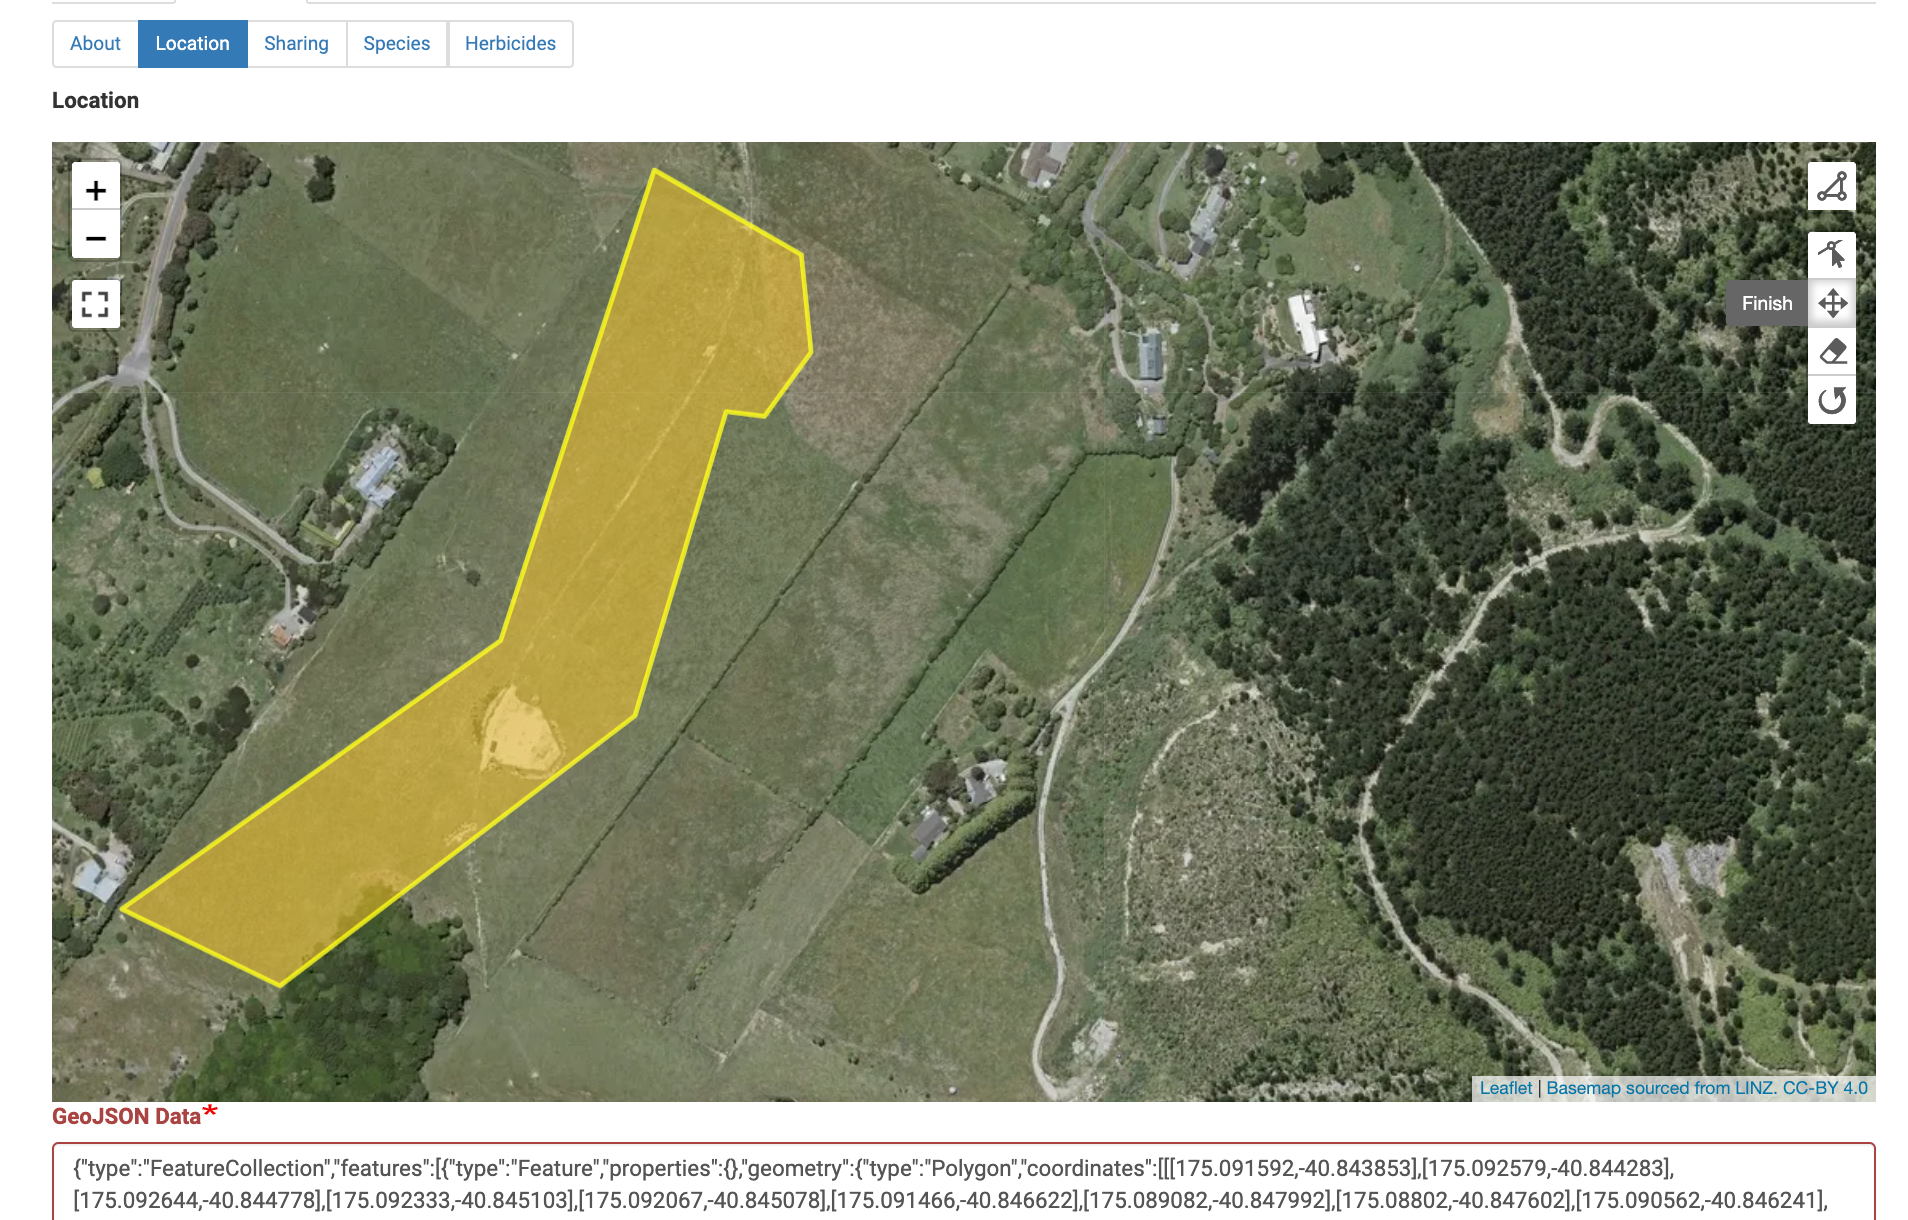
- Location - this sets the boundary for your project and determines the map area that is downloaded to the app. Use the map drawing tools to outline your area (see Section 3).
- GeoJSON - this field will be autofilled if you drew an area using the map. If you have a polygon for your project area already defined from a GIS system you can paste the data in here rather than using the drawing tool.
- List this project publicly - this will list your project (including the location, contact details, and description above) in the directory so others can find your project.
- Allow membership requests - if enabled, this will allow people to request to join your project. You will be notified by email when a request is made and you will be able to approve or reject requests via the membership tab.
- Share summary data - sharing will allow anonymised data from your project to be included in statistical reports. Making summary data available contributes to the national dataset and is invaluable for research into pest plant control in NZ
- Click the Save button at the bottom of the page
Once you've created your project you can start adding weeds, work areas, features, etc, and you can invite others to join your project.
Project settings
If you have created your own project, or are an administrator of a project, you can change project settings.


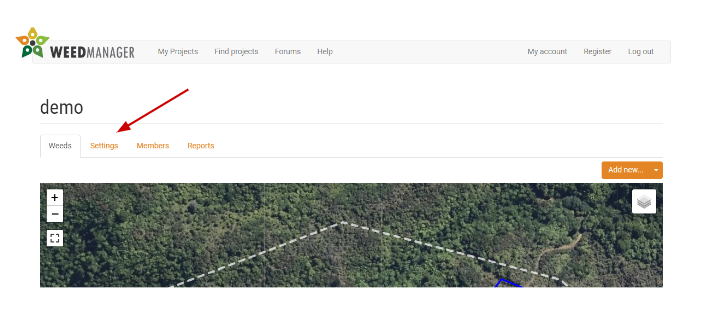
- Go to My Projects and click on the name of your project.
- Click Settings in the project menu.
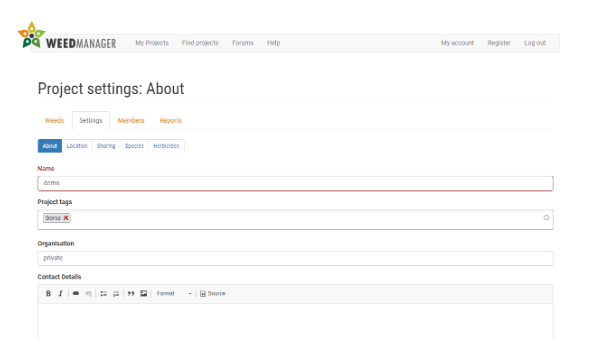
- The About, Location, and Sharing tabs allow you to edit the information you entered when creating the project.
- The Species and Herbicides tabs are described below.
Using the Species tab
WeedManager is preloaded with a list of weed species. You can customise this to make a shortlist for quick and easy access when adding weeds via the website or the app.
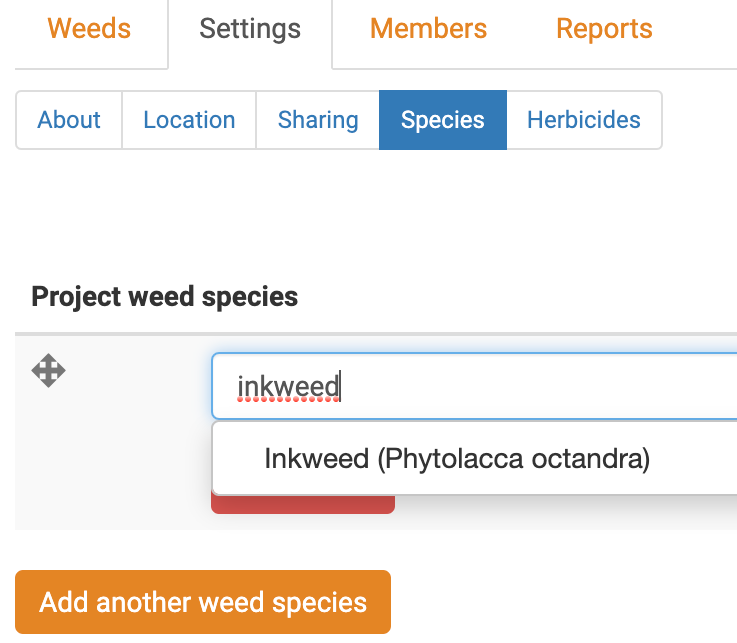
- Click the Species tab to select weed species you are managing for this project.
- Weed species not listed here can still be managed, but selected species will be shortlisted to appear at the top of the lists.
- To add a weed to the shortlist, start typing its name (either common or scientific). Matching weeds will appear in the dropdown.
- Select the weed and click Add another weed species to add additional species, or click Save to finish.
- If a weed does not match the preloaded list, double check the spelling.
Using the Herbicides tab
WeedManager is preloaded with a list of herbicides and allows you to create customised herbicide mixes.
- Click the green + Add new mix button.
- Give your mix a helpful Name (eg. “Blackberry TBXT”) and optionally a more detailed Description.
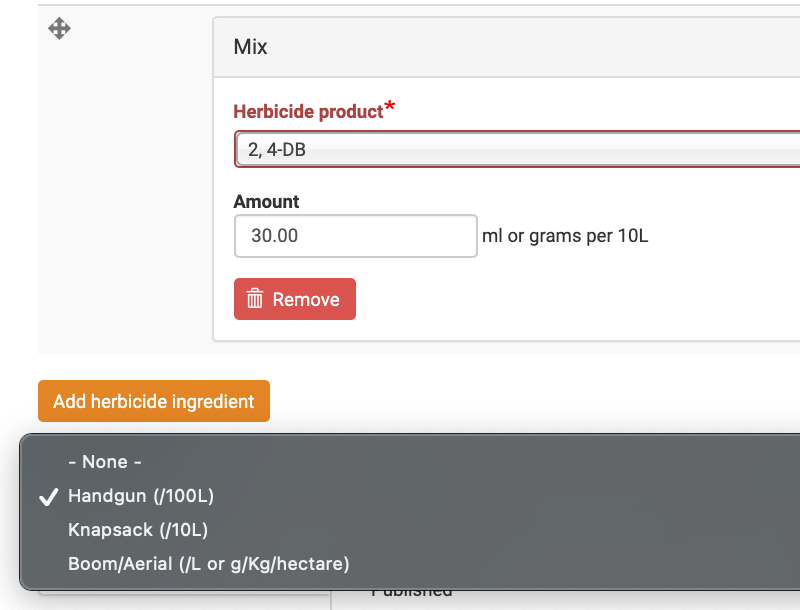
- Under Mix you can create a custom mixture.
- Select the first Herbicide product you want to include in your mixture
- Choose the Amount per 10 litres (in ml or g)
- Click Add herbicide ingredient and repeat for the remaining ingredients.
- Choose an Application Method
- When your new mixture is complete click Save to finish.
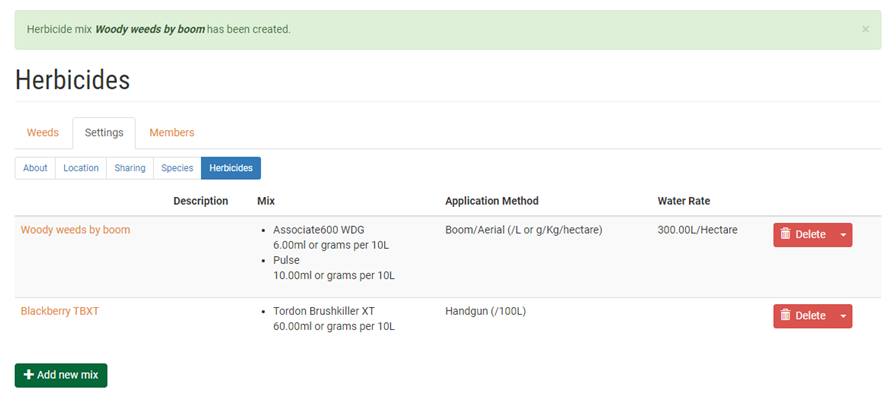
 As an example, you should see something like this after creating a mix or two
Adding new Species or Herbicides
If you want to add a Species or Herbicide which isn’t included, please contact us with the relevant details via either:

Deleting your project
Only users with an "Administrator" role in a project can access these tools.
As an administrator, you can delete an existing project. Please note, all the project information will be lost once a project has been deleted.
To delete a project:
- Select the project from your My Projects list
- Click the "Settings" tab
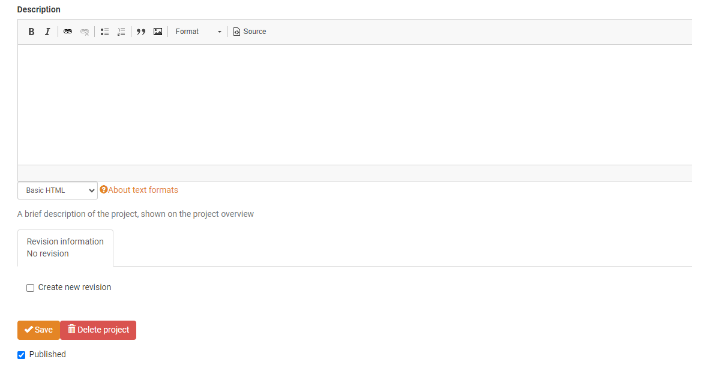
3. Scroll to the bottom of the form that loads, and click the red "Delete" button
4. On the confirmation screen, click the "Delete" button
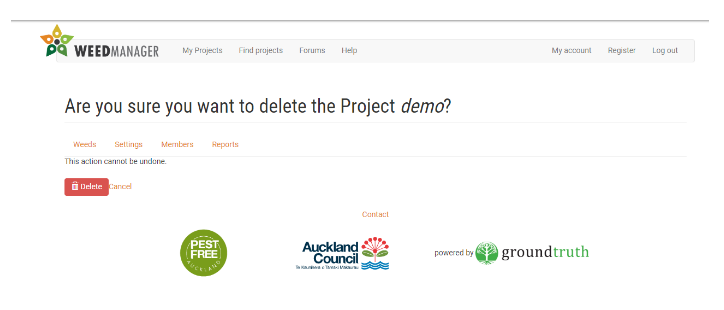
5. Your project has been deleted!
Using the map tools
The map tools will be used to record your information on weeds for your project. Once identified, weed control can be monitored, assigned for control and record any controls which have been carried out. The map tools can also be used to record relevant features, tracks and work hours.
Moving around the map
You can pan around the map by clicking and dragging anywhere on the map. Use the icons in the top left corner of the map to zoom to your desired mapping area
|
|
Zoom in
Zoom out |
|
|
Make the map full screen |
|
|
Exit full screen |
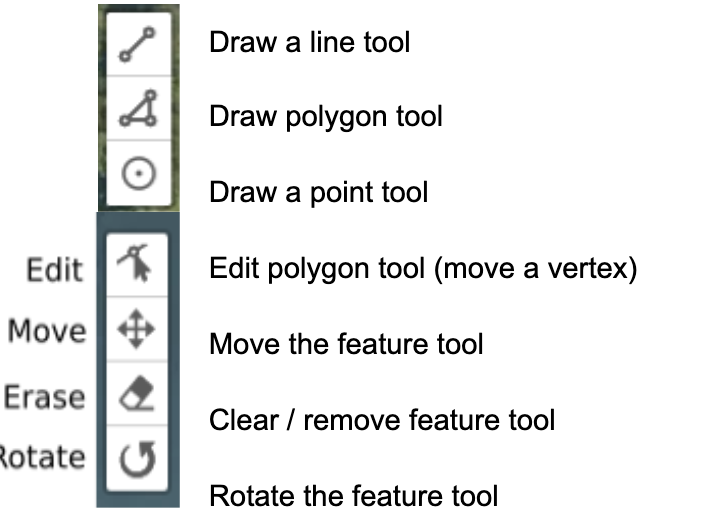
Understanding the map tools
The map tools can be found at the top, right of the map. You can see the name of each tool by hovering the mouse over the icon.
Drawing a shape with the map tools
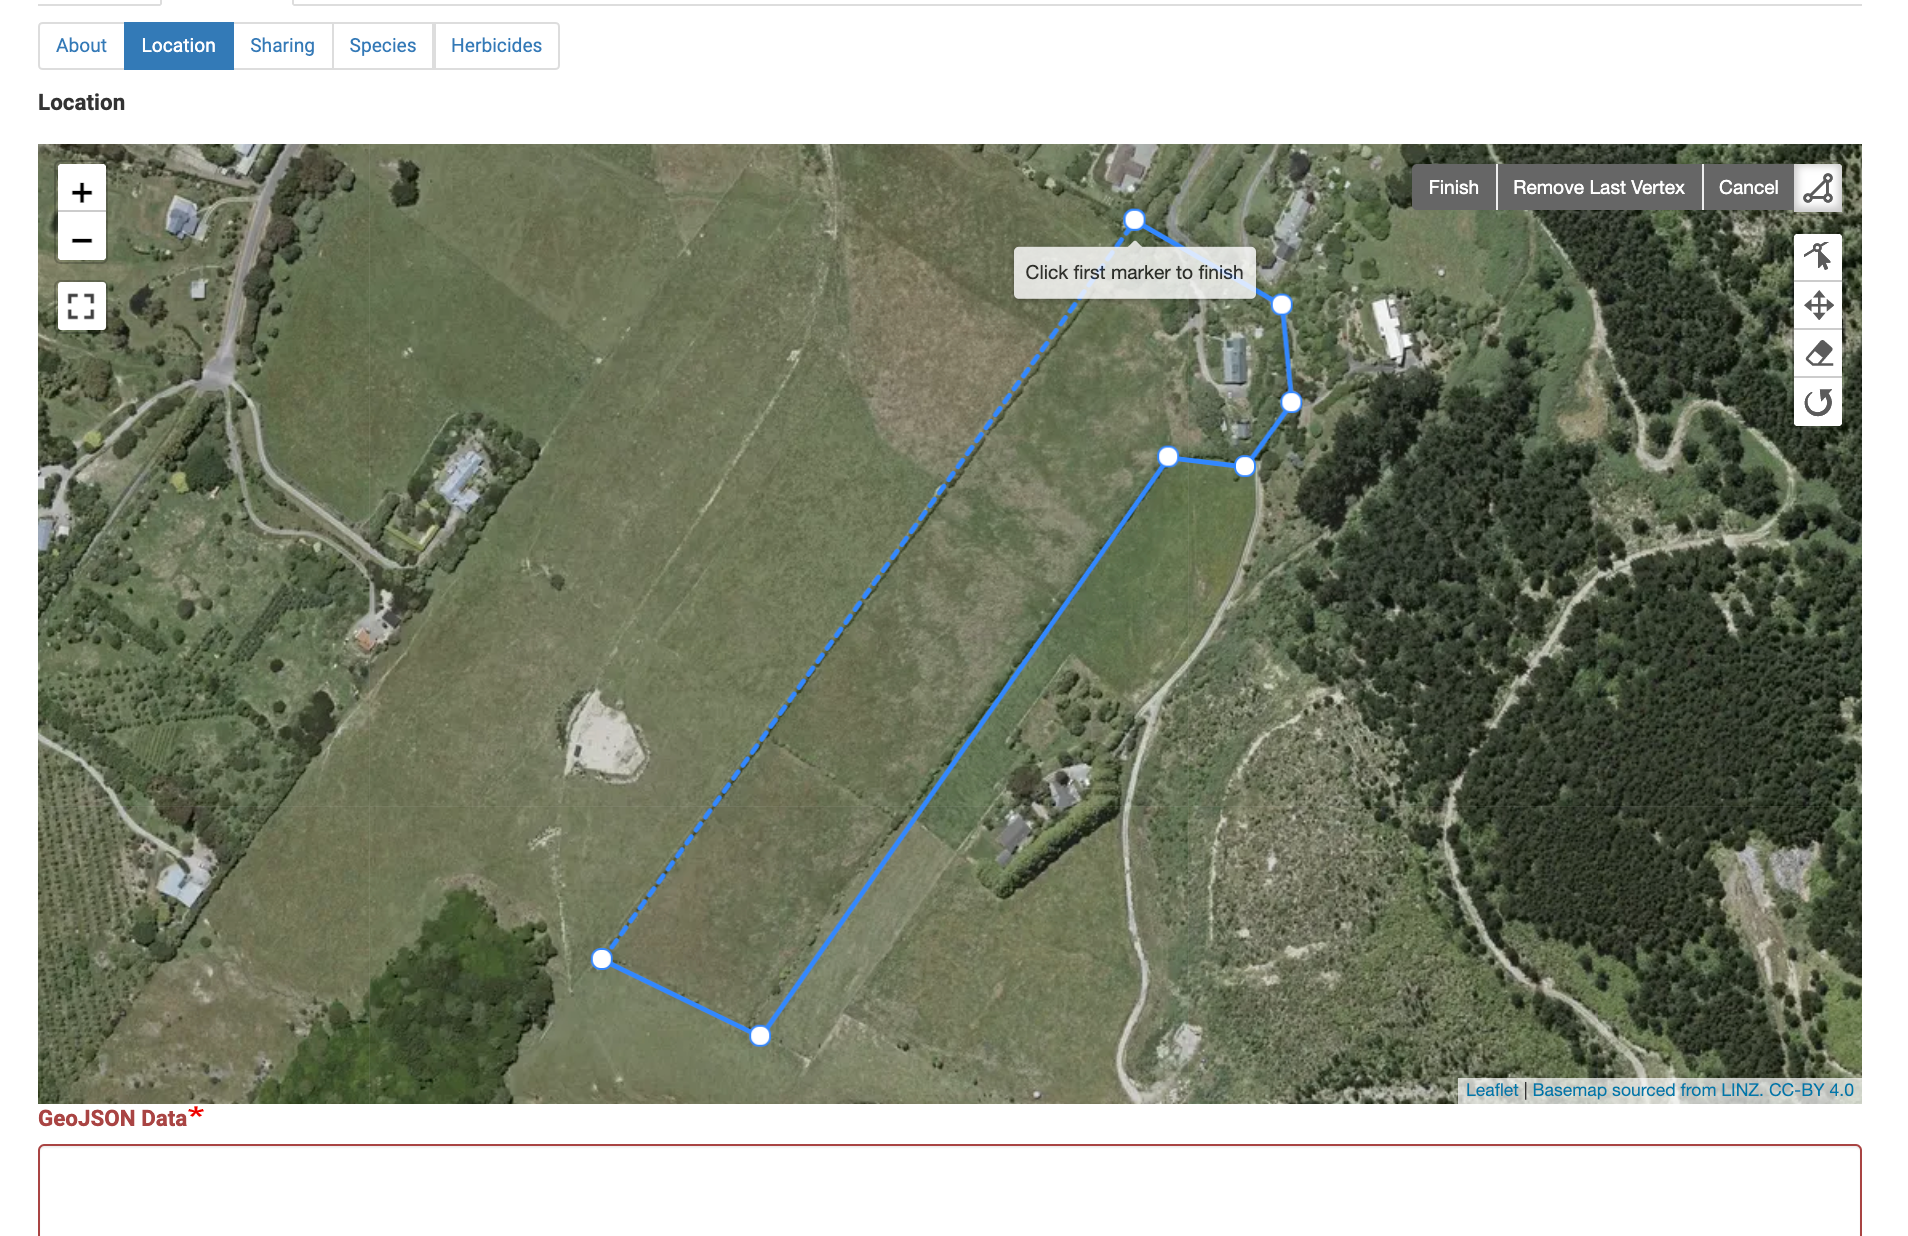
- To start drawing a polygon on the map, click on the polygon tool to activate it.
- With the polygon tool active, click on the corners of the area that you want to manage. This will define the boundaries of your shape.
- To finish, click on the first marker to close the shape.
Editing a shape with the map tools
If you didn't get the shape quite right you can change it:
- Click on the "Edit" tool.
- The vertices of your shape will have white circles - you can drag any of the circles to adjust you shape.
- When you are done adjusting, click the "Edit" tool again and the outline will return to normal

Moving the shape on the map
If you drew the correct shape but put it in the wrong place you can drag it to a new location on the map.
- Click on the move features
 (or Drag layers) tool.
 - Now click inside the shape you drew and drag the shape to where you want it to be
- When you are done moving, click the move features tool again.
Managing weeds and work areas
WeedManager can be used at a range of levels from simple recording of completed weed control activities through to identifying weeds, monitoring weeds, assigning control activities to volunteers or contractors, recording controls which have been carried out and the time taken and monitoring the effect or outcome from that control. The first step is to record a target weed as an area (polygon), line or circle (point).
Adding a weed to be managed
Click on the Weeds tab under your project title, then click on Add new …. A list options will appear, choose Weed. 

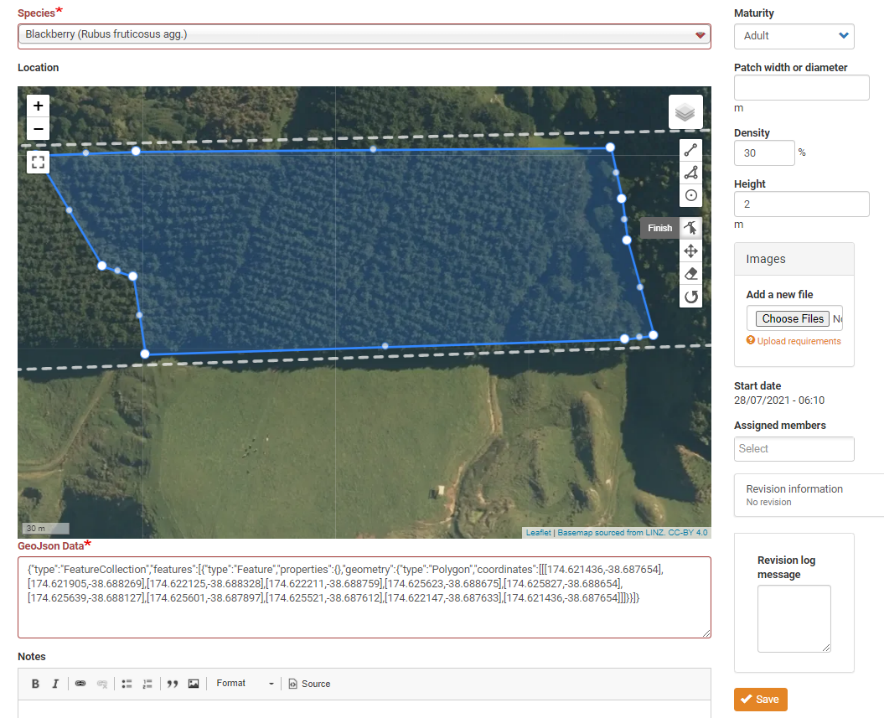
WeedManager will zoom out to show your entire project and you will see the weed entry form and map tools. Zoom in and pan to where the target weed occurs. Choose the map tool to either draw a polygon, line or circle marker to identify the location of the target weed. The example below shows data entry where 30% of the area is covered in 2m high adult blackberry. Save to finish data entry.
The screenshot below shows multiple weeds which need to be managed. An area of blackberry, a patch or agapanthus, and a line of gorse.

Using work areas
Work areas are used to group weeds, or weed patches, in an area. Work areas can then be assigned to volunteers or contractors for management. Work areas can overlap or be nested inside larger work areas.
You can add a work area before or after adding a weed. Any new weeds added within the bounds of a work area are automatically included as part of the work area.
- Under the Weeds tab in your project, click Add new…. A list options will appear in a drop down menu.
- Select Work area from the list.

- Under Create Work area give the area a Name.
- Zoom in to the area you wish to define as a work area.
- Choose the polygon map tool to draw the boundaries of your work area.
- Click Save to finish data entry.
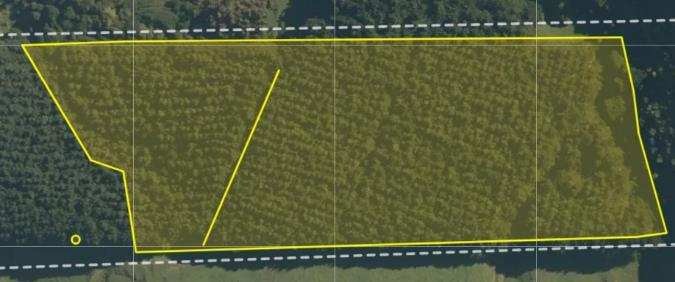
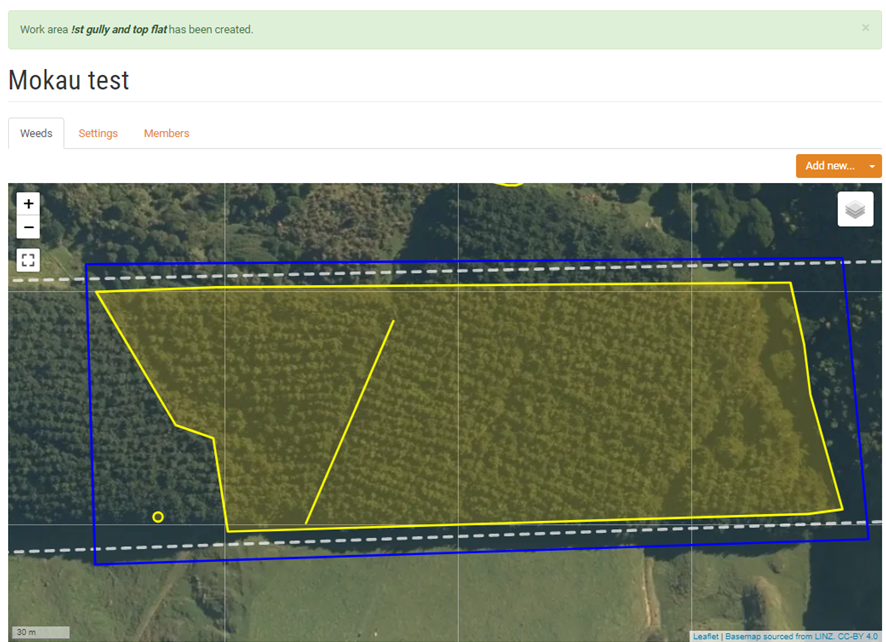
The work area will appear as a blue lined polygon. The example below shows a work area with three species of weeds.
Selecting a weed for action
Under the Weed tab you will see your map with a list of weeds in your project area with a filter tool.
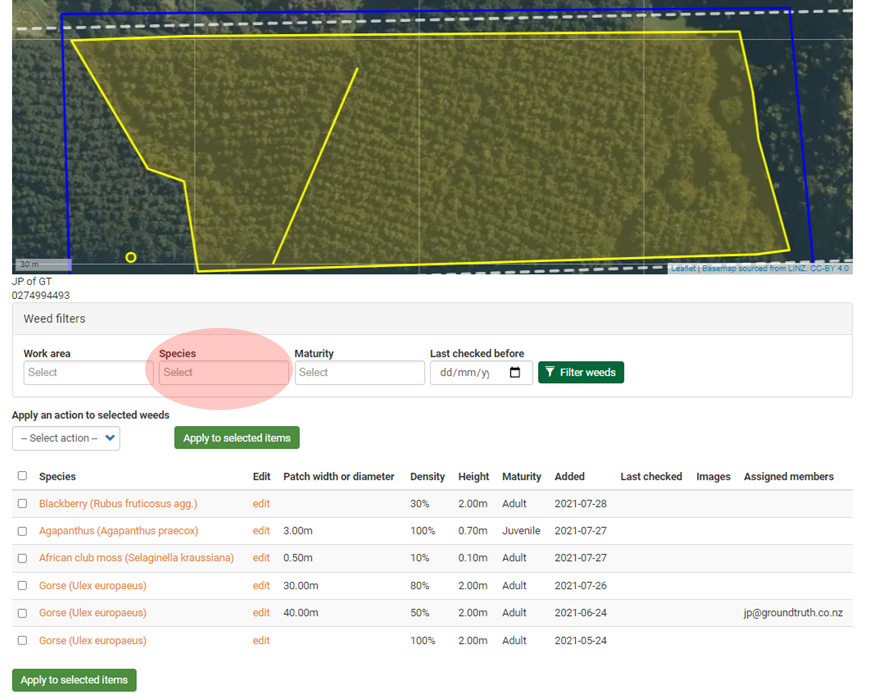
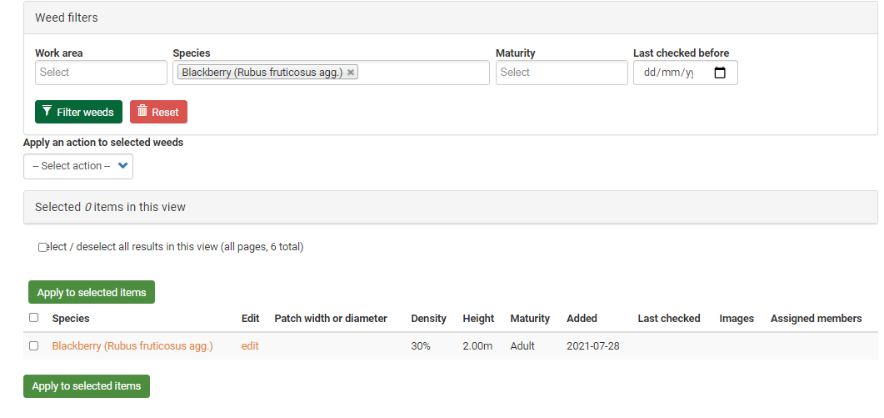
Filter by weed species
You can filter the list of weeds by species to assign or record a management action. Click in the Species box and begin typing to only display selected weed species.
Once your weed species has appeared, click on Filter weeds. The list below will show only the chosen species. 

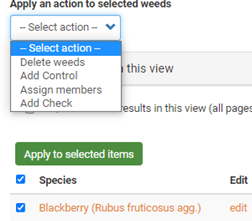
Apply a management action to a weed
Once you have selected the weed(s) you can choose a management action:
- Delete weeds: delete a weed
- Add Control: allocate or record a control
- Assign members: assign a member to that weed
- Add Check: records a monitoring check to track the effectiveness of control
Controlling weeds
- Select Add Control from the drop down menu and click
 Apply to select items.
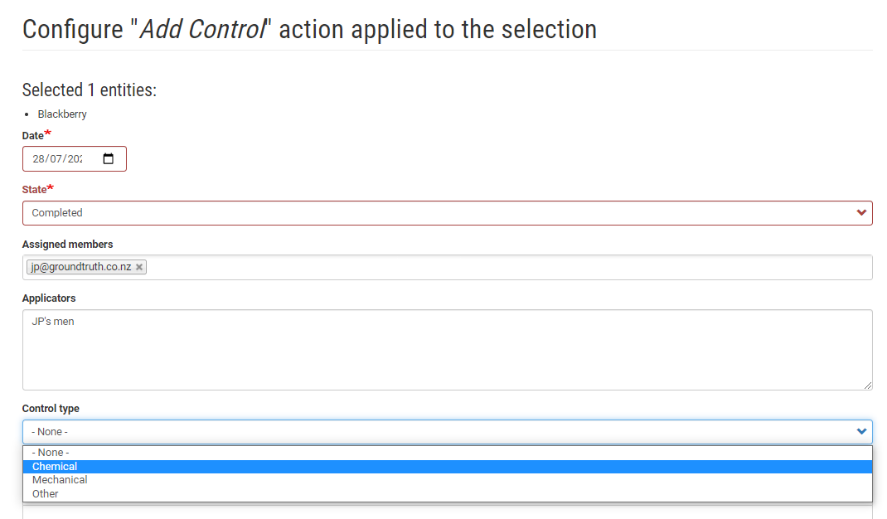
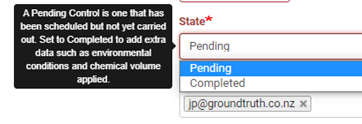
 - Check the Date, choose the State of the action (either Pending or Completed), add Assigned members.
- Select the Control type from the menu (Chemical, Mechanical, or Other) and provide the additional details required for the method chosen.
- Notes can be added to describe additional details.


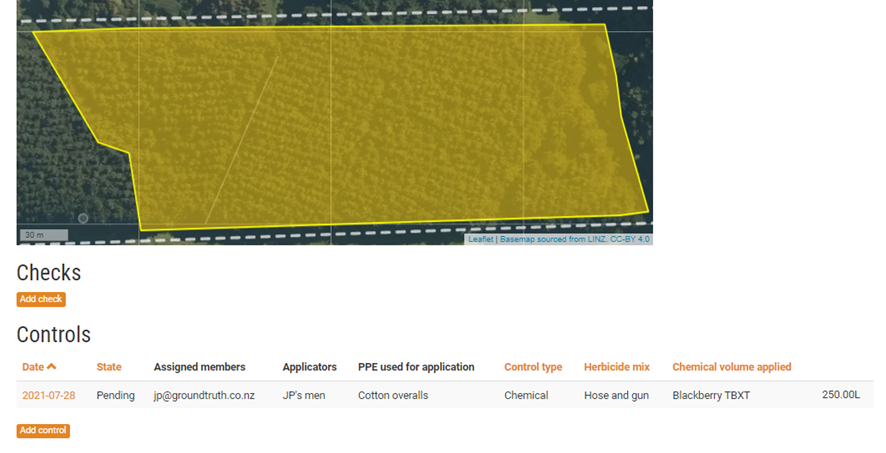
For a Completed chemical control action, this becomes a record of application or spray diary entry. Factors critical to that aside from who, where and what is how much and what were the conditions. This information can be also be added as shown on the right. The Chemical Volume Applied is the total amount of spray mix used for the action.
Once you have entered the information click on Apply  to save the record. You can see the record by clicking on the weed under the weeds tab. To go back to that tab click on My Projects then click on your project and click on the weed.


The screenshot below shows the record as Pending action. This can be updated to Completed by clicking on the date for the record.
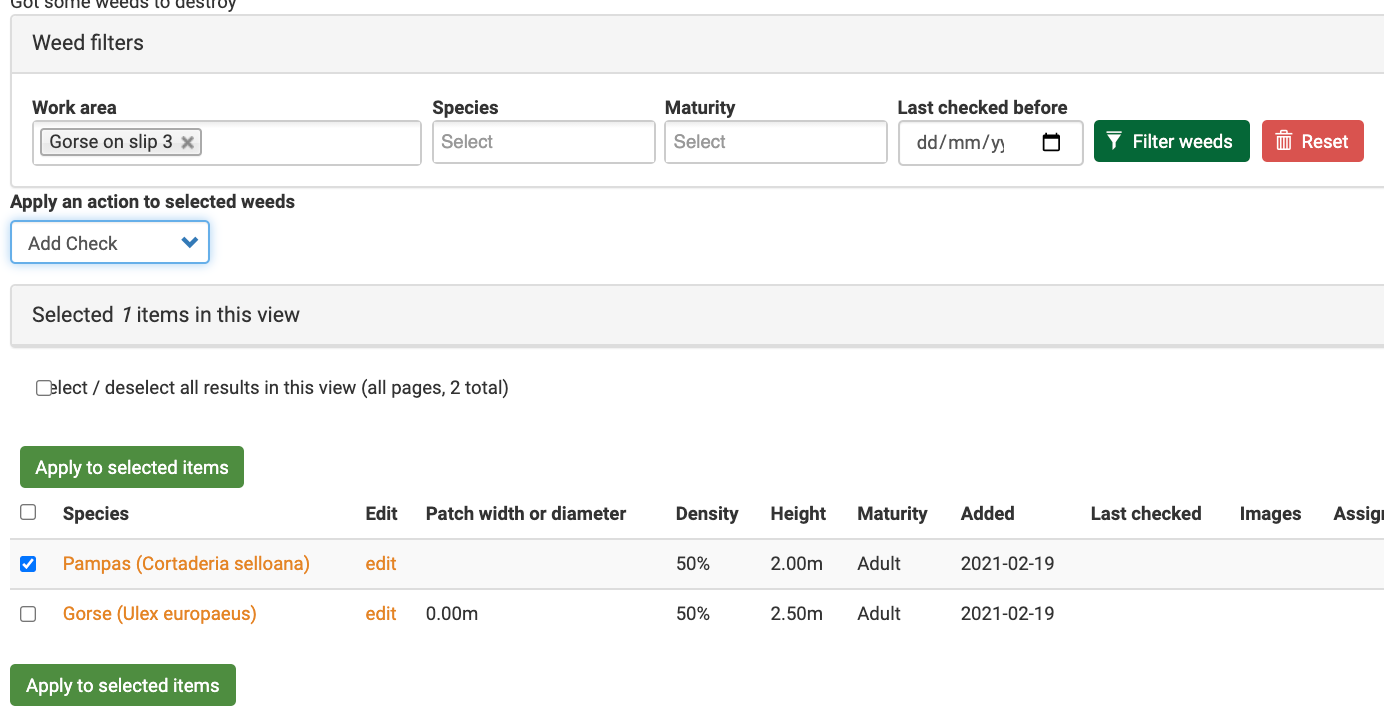
Using a Work area to select weeds for an action
A work area can be used to group a number of weeds into an area for management by volunteers or contractors. Under the Weed tab your map, and a list of weeds will appear in your project area with a filter tool.
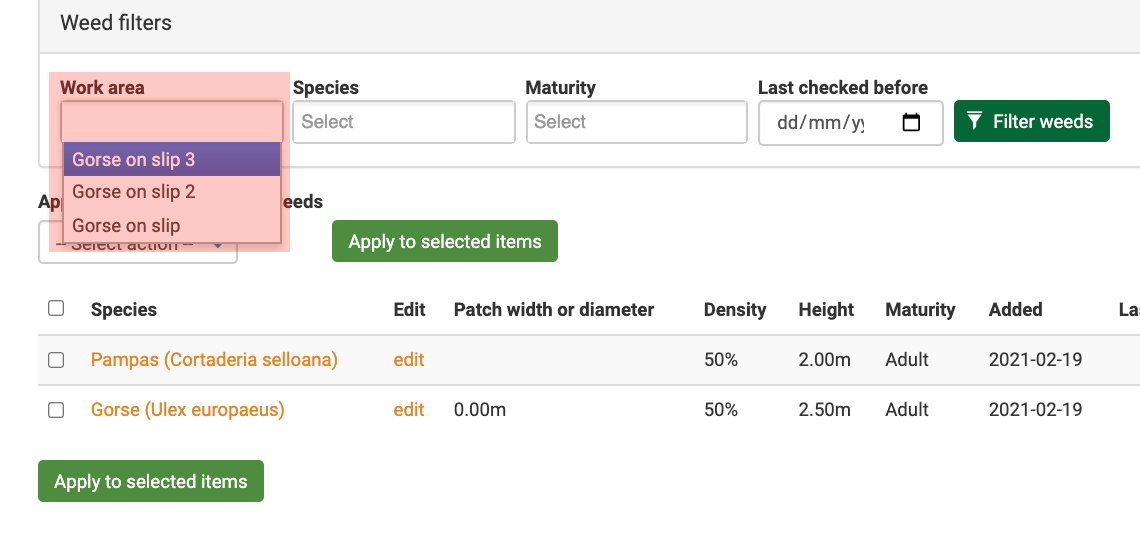
Filter by Work area
- Click in the Work area box and select a work area.
- Click the Filter weeds button.

- The list below will show only the weeds occurring in that work area.
- Select (tick) the weeds you wish to apply an action to (control, check, assign or delete)
 Assign member
A member of the project can be assigned to a specific weed, or the weeds within a work area. You can assign a member to a weed in three different ways:
Applying an action on the project home page:
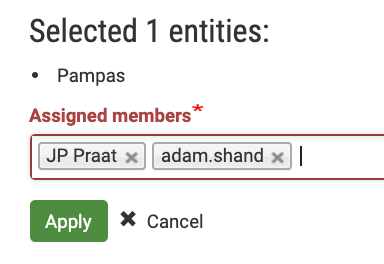
- Select the weeds you wish to assign, choose Assign members as your action and click Apply to selected items

- Choose a member(s) you wish to assign and click Apply.


Directly editing a weed:
-
Using the edit button next to a weed:


Adding a feature
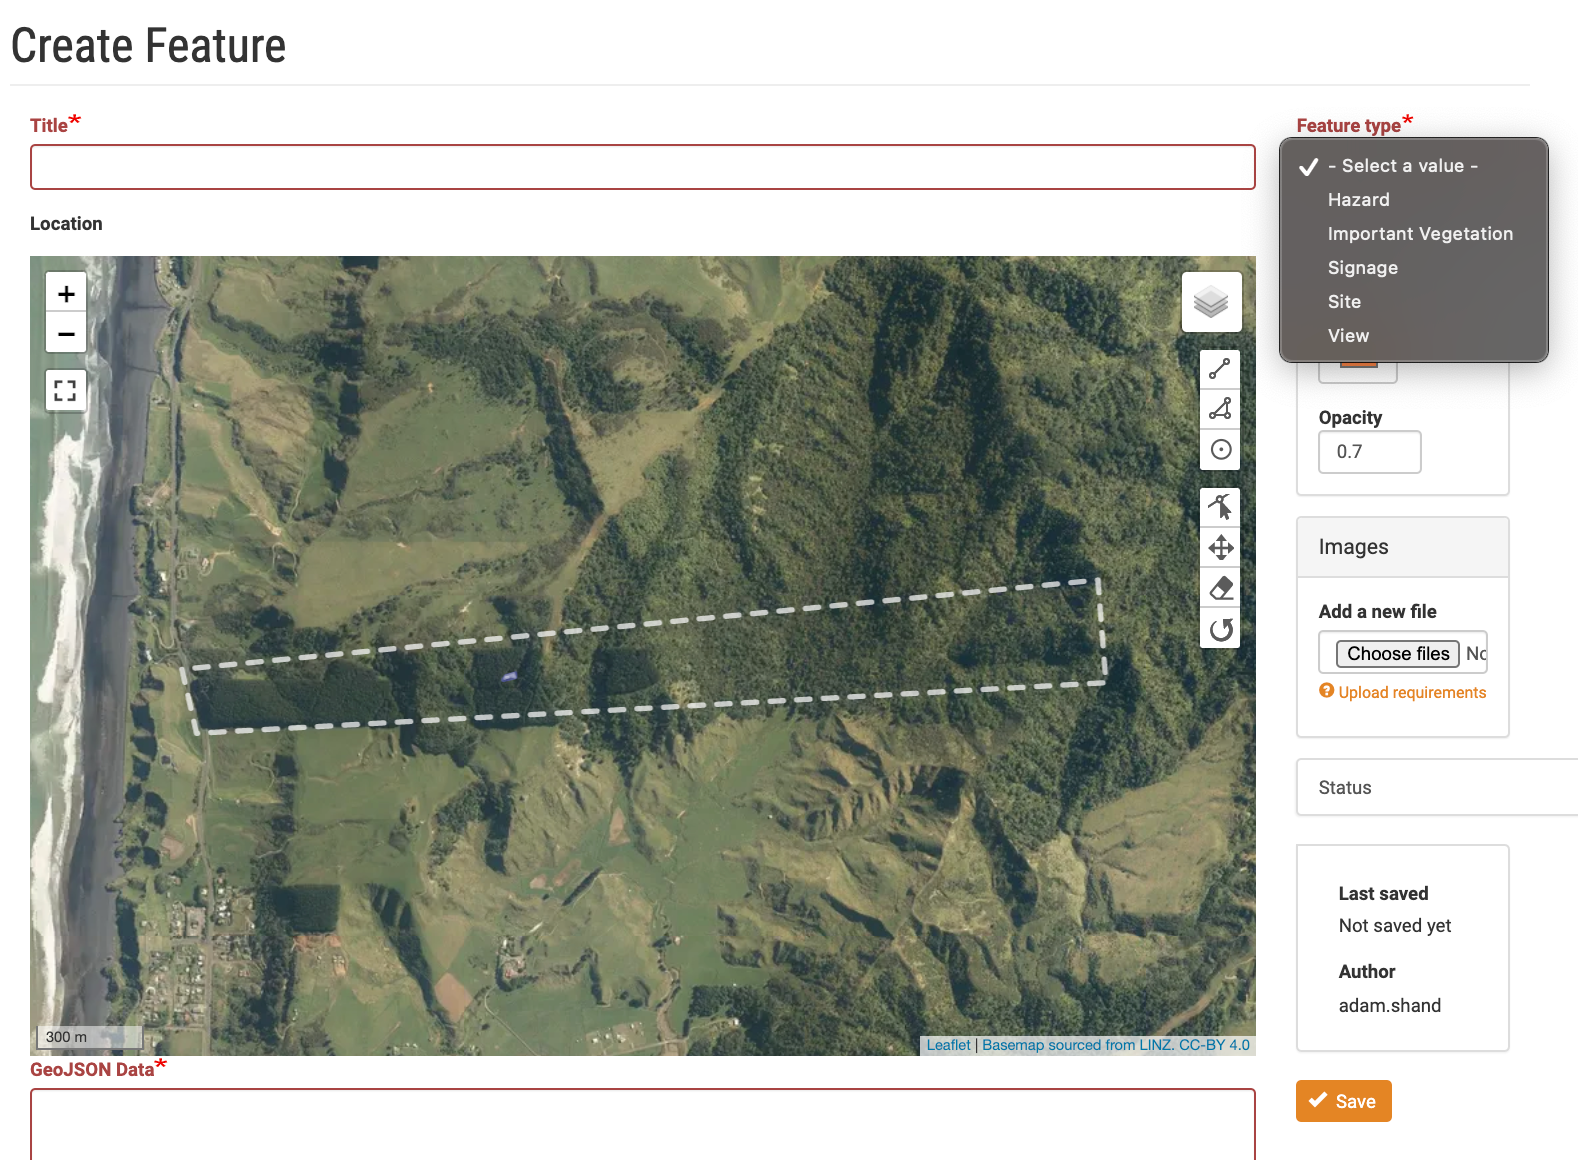
WeedManager will allow you to add other features to the map as well. Features which can be added include Hazards, Important Vegetation, Signage, Sites, and Views.
To add a feature to you project map:
- Under the Weeds tab on your project page, click Add new… and choose Feature.
- On the Create Feature page give the feature a Title and select a Feature type.
- Use the map tools to place the feature on the map.
- Optionally upload images of the feature.
- Click on Save to finish feature entry.

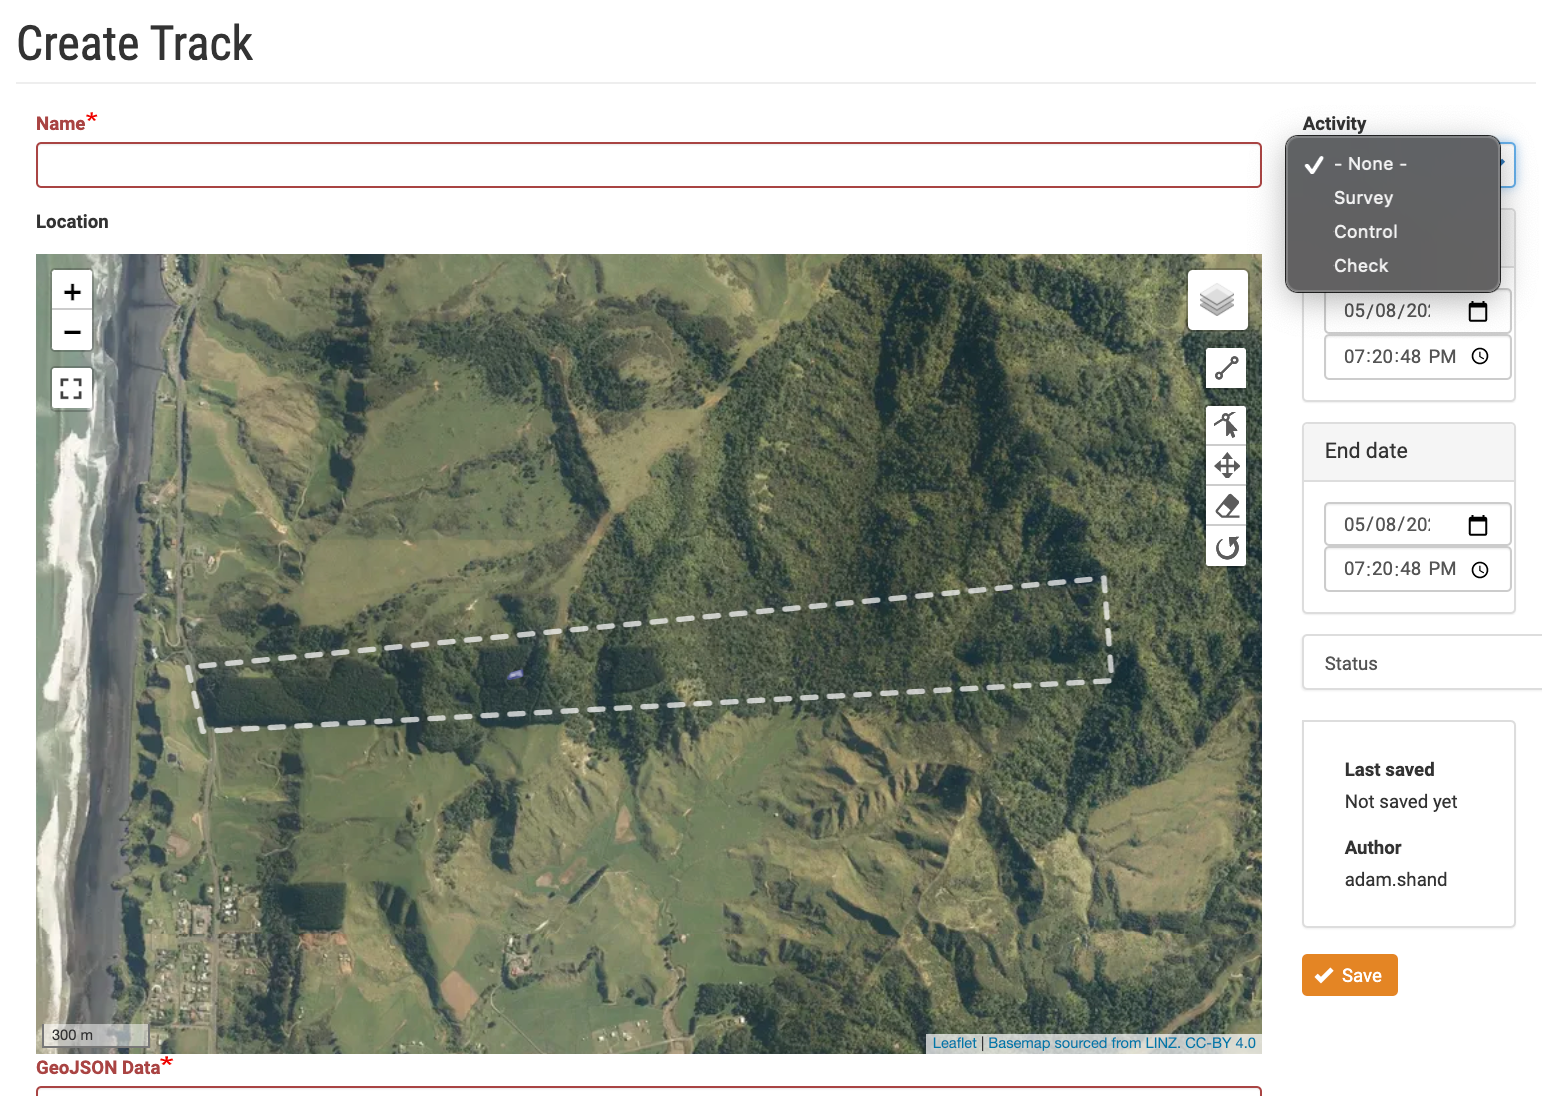
Adding a track
Tracks can used to to show the physical path taken when surveying, controlling, or checking the results of controls.
- Under the Weeds tab on your project map click on Add new…. A list options will appear, choose Track.
- On the Create Track page use the map tools to place the track on the map.
- Track types can be for Survey, Control and Checking the result of a control.
- Click on Save to add the track.
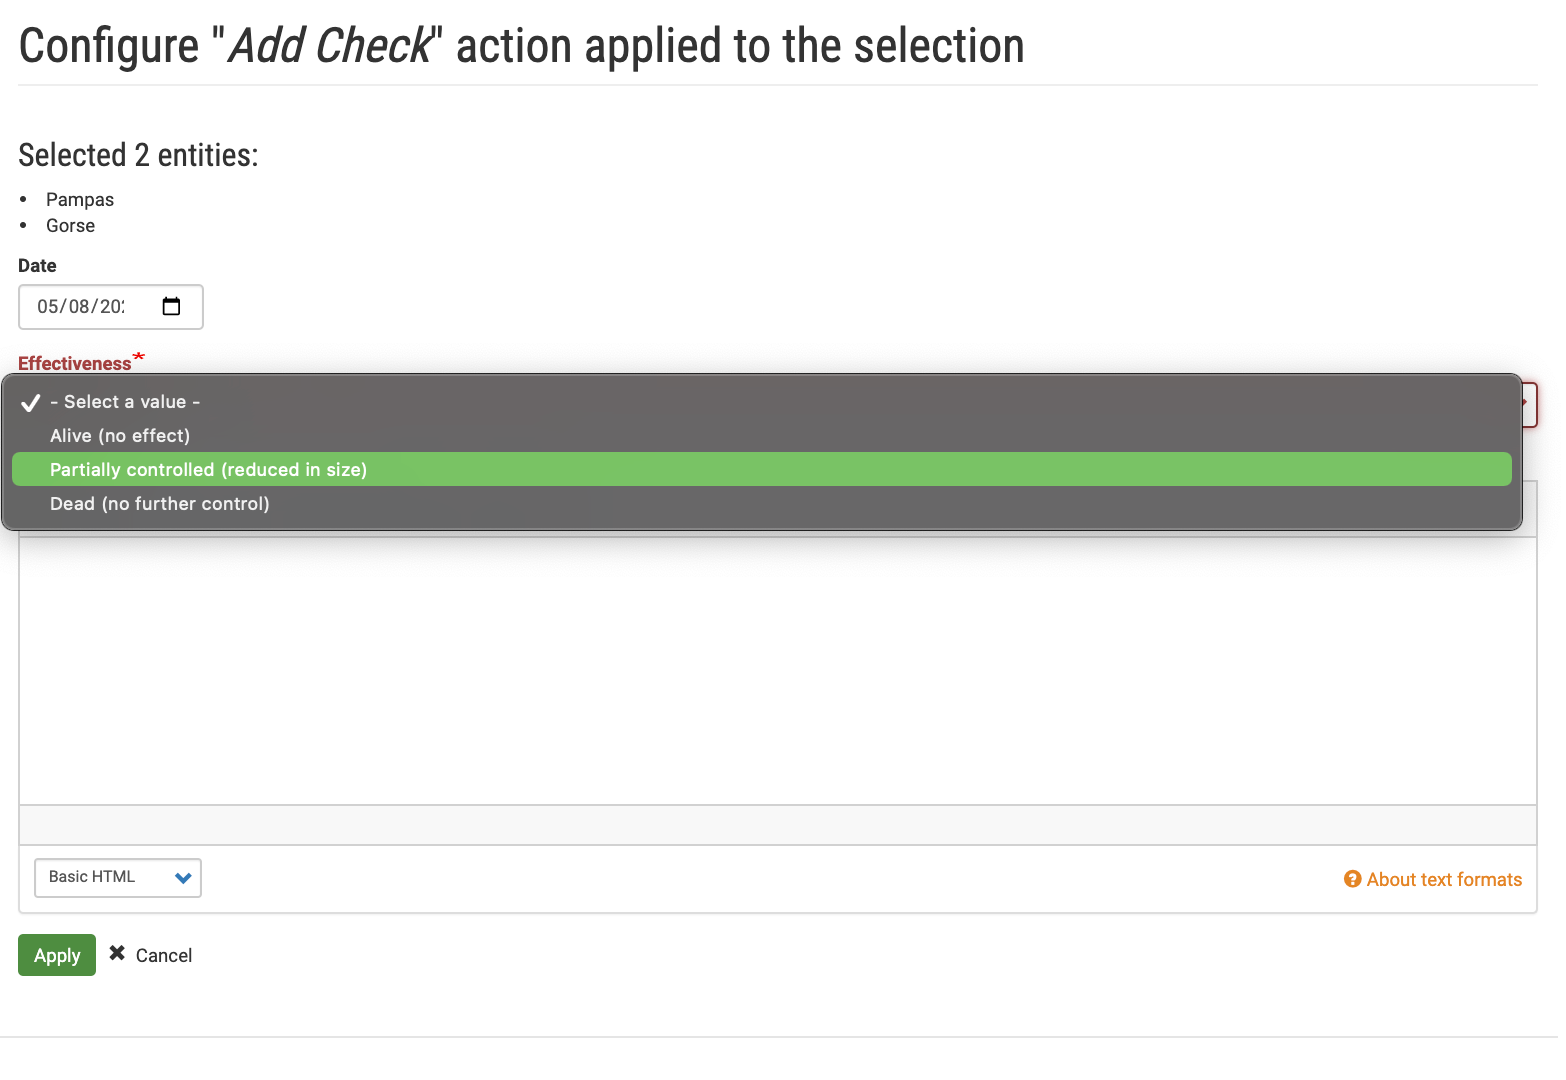
Checking a control
After a chemical or mechanical control has been applied checks can be recorded for effectiveness. Select a weed or weeds from the list under the Weed tab. You could use the Work area and Filter tools to refine your selection. Once a weed is selected, select the action Add Check and click on Apply to selected items.
You will now see Add Check entry form. Note the weed species is correct and select from the available descriptions in the drop down menu. Control check descriptions include:
- Alive (no effect)
- Partially controlled (reduced in size)
- Dead (no further control required)
Add any useful notes such as variability in control or apparent misses. Choose a description and click on .
The date of the last check will be shown under the Weeds tab:


Recording work hours
You can record the hours worked against a work area.
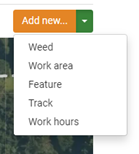
- Click on the Weeds tab under your project title, then click on Add new.
- A list options will appear, choose Work hours.
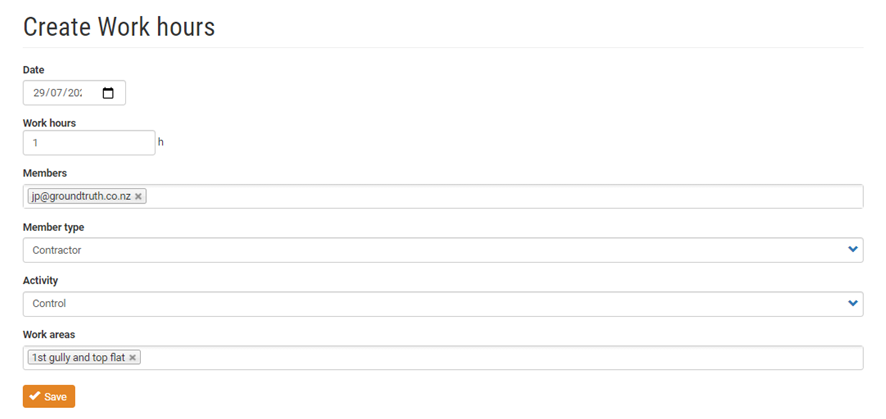
- You will then see the Create Work hours form.
- Fill in the details such as Work hours, Members, Member type, Activity and the Work areas.
- Click on Save to record work hours.

Member management
Invite members
- Click the My projects link in the menu
- Select a project from the list, or create a new project
- Click the Members tab
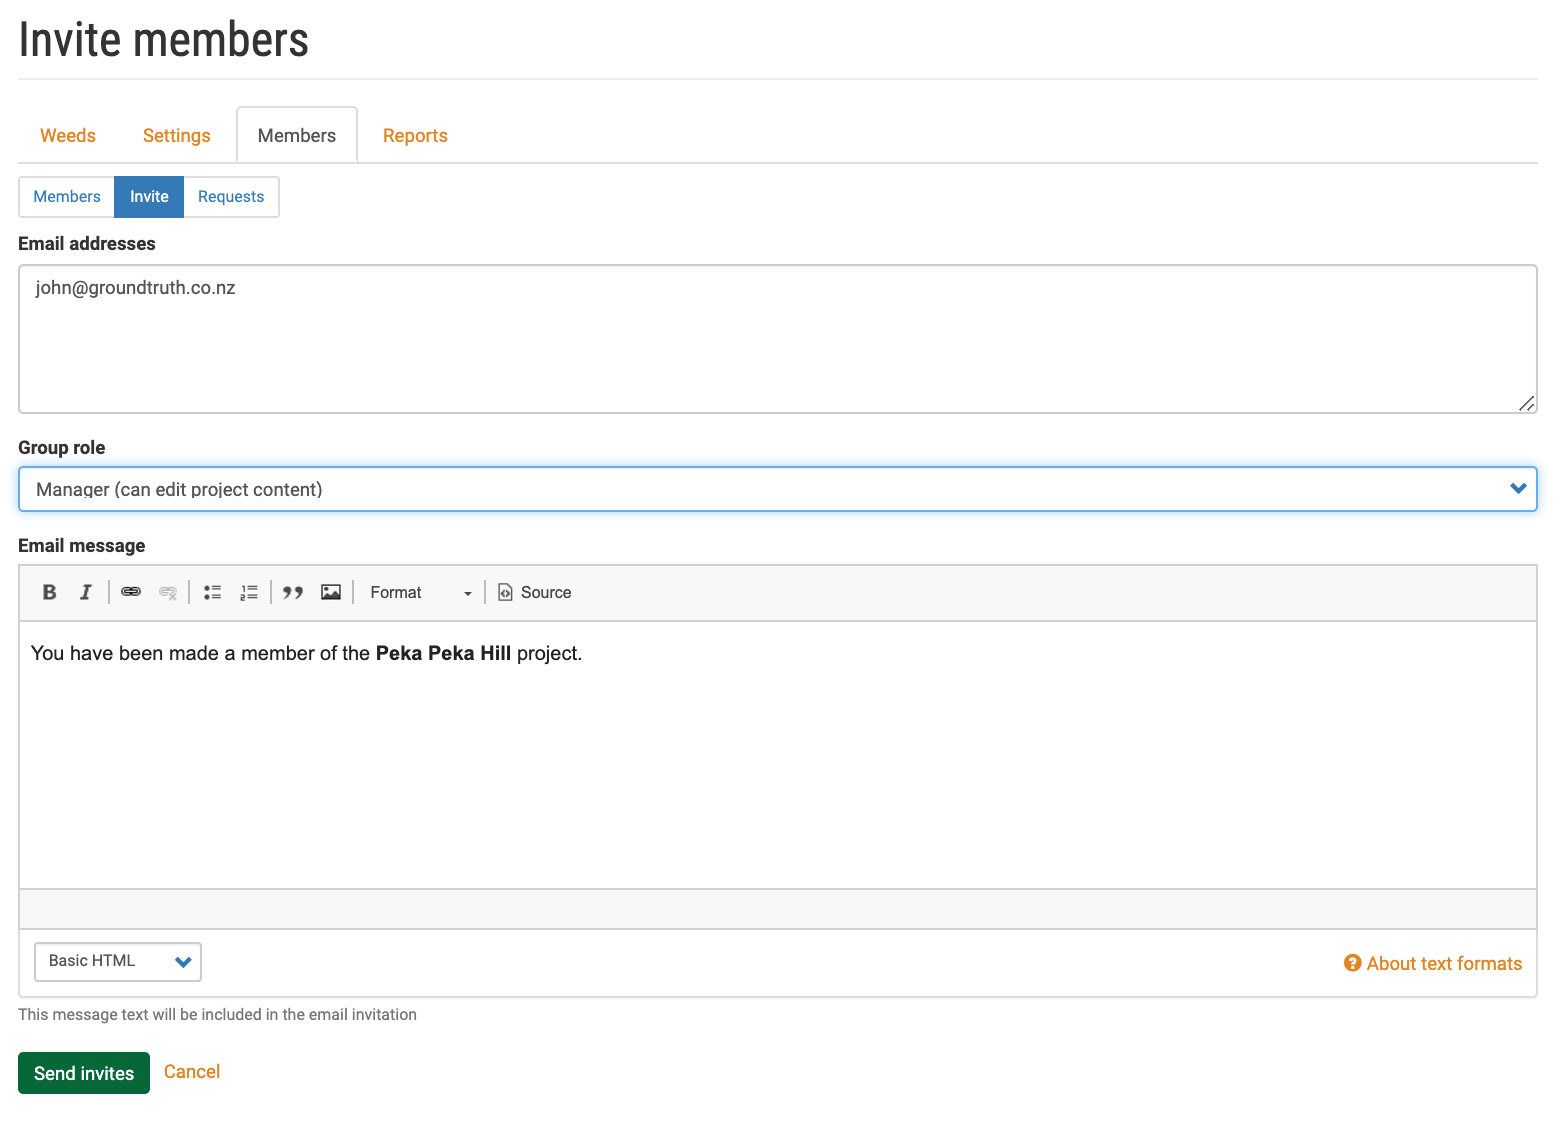
- Click the Invite sub-tab
- Enter an email address that has not already been used, select a Group role and add a custom message
- Click the Send invites button
- Confirm the You have been made a member of… email is received with the custom email text
- Confirm the An administrator created an account for you at Weedmanager email is received
- Click the Members sub-tab
- Confirm the invited user is listed with the assigned Role
- Click the Invite sub-tab
Add or remove invited members
- Click the Members tab
- Click the Add member button
- Enter the username of the removed member
- Confirm that the username autocompletes
- Assign a Role and add a custom email message
- Click the Save button
- Confirm the You have been made a member of… email is received with the custom email text
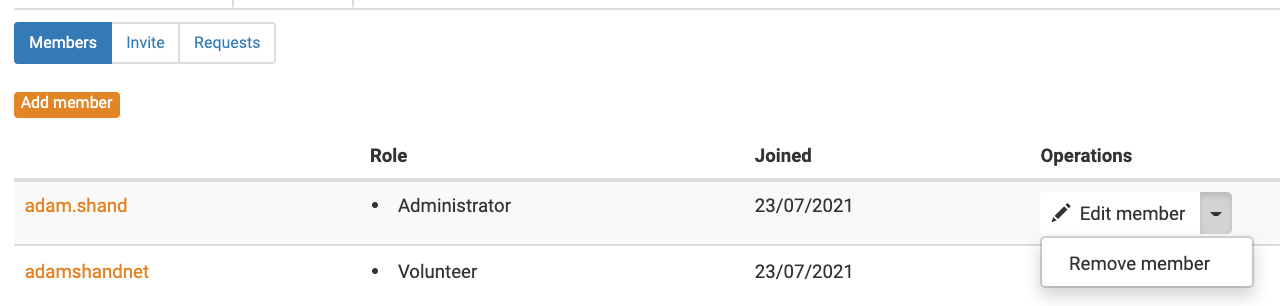
- Click the Members sub-tab
- Confirm the invited user is listed with the assigned Role
- Click Remove member from the Operations dropdown
- Confirm the user is no longer a member of the project
Membership requests
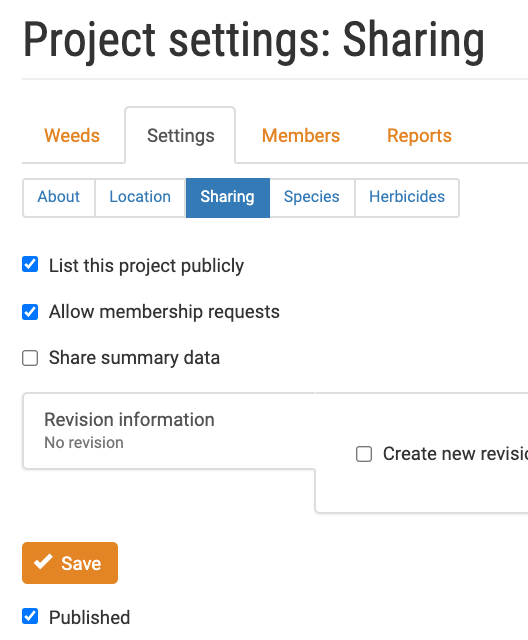
- Click the Settings tab
- Click the Sharing sub-tab
- Tick the List this project publicly and Allow membership requests checkboxes and Save
- Click the Find projects link in the menu
- Confirm you can locate the project in the list or by searching
- Click the project link
- Confirm the Request membership button is present
- Click the Request membership button
- Enter a custom message and click Confirm
- Confirm the project owner receives a notification of the request with the custom text
- Log back in as the project owner
- Click the Members tab
- Click the Requests sub-tab
- Confirm the request is listed
- Click the Approve membership link
- Set a Role, enter a custom message and click Save
- Confirm the confirmation email is received with the custom message
- Confirm the request has been removed from the Requests page
- Click the Members sub-tab
- Confirm the member is listed with the assigned role

Member access
- Ask the newly joined member to Log in
- Click My projects
- Confirm the joined project is listed
- Click the project link
- Confirm the Request membership button is not present
Using the App
The WeedManager app is designed to be used in the field. It provides a map of the management area and the ability to update management actions in the field.
App overview
The WeedManager App is a companion to the WeedManager.NZ website. The app enables weed locations, density, controls, and checks on controls to be entered while in the field (including areas without cellphone coverage).
You can download the App from the Play Store or the Apple App Store.


Before you can use the app you need to create an account on WeedManager.NZ and join a project. Once you have an account on the website, you can use your email address and password to log into the App.
If you created a new project, rather than joining an existing project, you must also create a herbicide mix on the website before you can apply a chemical control.
When you first log in to the app you will be shown a list of projects you are a member of. Select one and you will be taken to the main map screen:

 Use the
  icon at bottom right to add a weed or feature,
- the
 icon at bottom left to add a control or check to an existing weed, and
 - the
 icon pressed will show your location on the map (you must allow WeedManager access to your location using the GPS on your mobile device).
Adding a weed or feature
When adding a weed or feature you have the option of adding a line, polygon, circle marker (point), or using a GPS track:
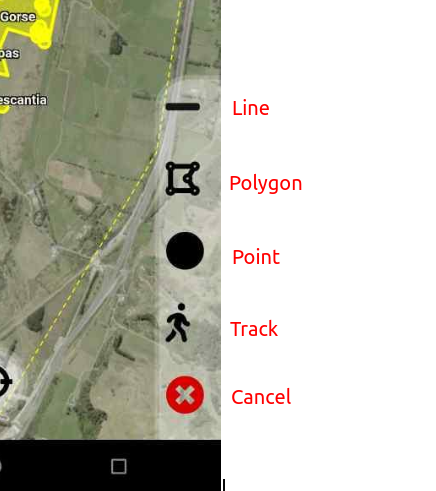
Tap on ![]() and select the shape you want to add, tap on the map to draw or drop a point. You can move points or line vertices after you have added them by touching and dragging the vertex.
and select the shape you want to add, tap on the map to draw or drop a point. You can move points or line vertices after you have added them by touching and dragging the vertex.
Once you have added the shape you can tap the Tick symbol to bring up the weed or feature entry form:

Use the tabs at the top switch from adding weed to a feature. When you have entered the information you need to press and hold the save button - the button will turn green and the form will disappear when the weed or feature has been saved / added. If you have added a weeds you can now select that weed and apply a control or a check.
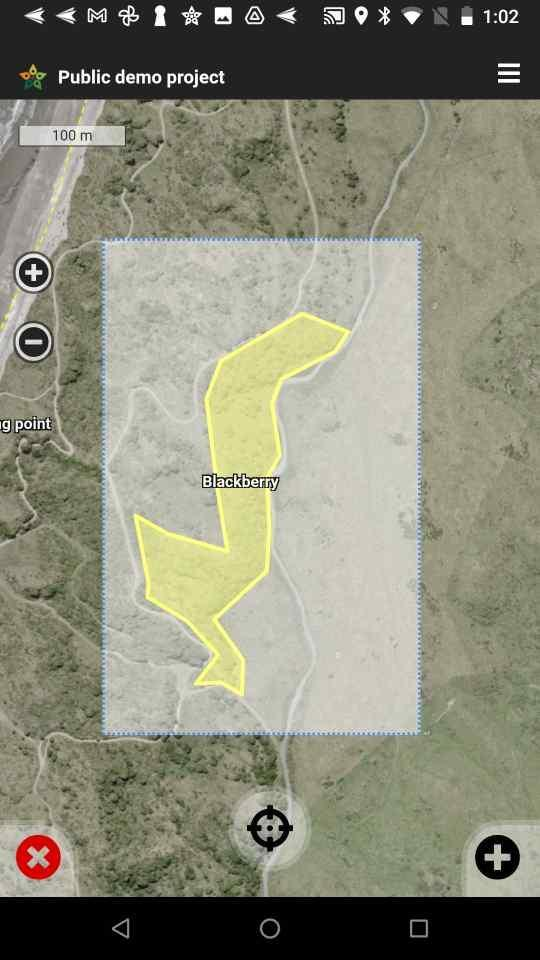
Adding a control or check
To add a control or check, zoom or pan the map so that the location of the weeds you wish to add is visible. When you Press the ![]()
 button at the bottom left it will turn into a
 ![]() (press the X if you wish to cancel adding).
(press the X if you wish to cancel adding).
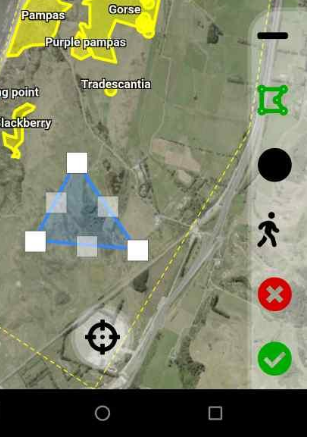
Next, either tap a single weed or drag your finger across the weeds that you want to add a control or check to - A rectangular guide will show the area of weeds to be selected:
 Make sure the weeds you want to select are completely within the rectangle. When you take your finger off the screen the selected weeds will be highlighted. Tap the
 ![]() to add a control or check.
to add a control or check.

Use the tabs at the top switch from adding a control to a check. When you have entered the information you need to press and hold the save button - the button will turn green and the form will disappear when the control or check has been added - it will be applied to all weeds selected.
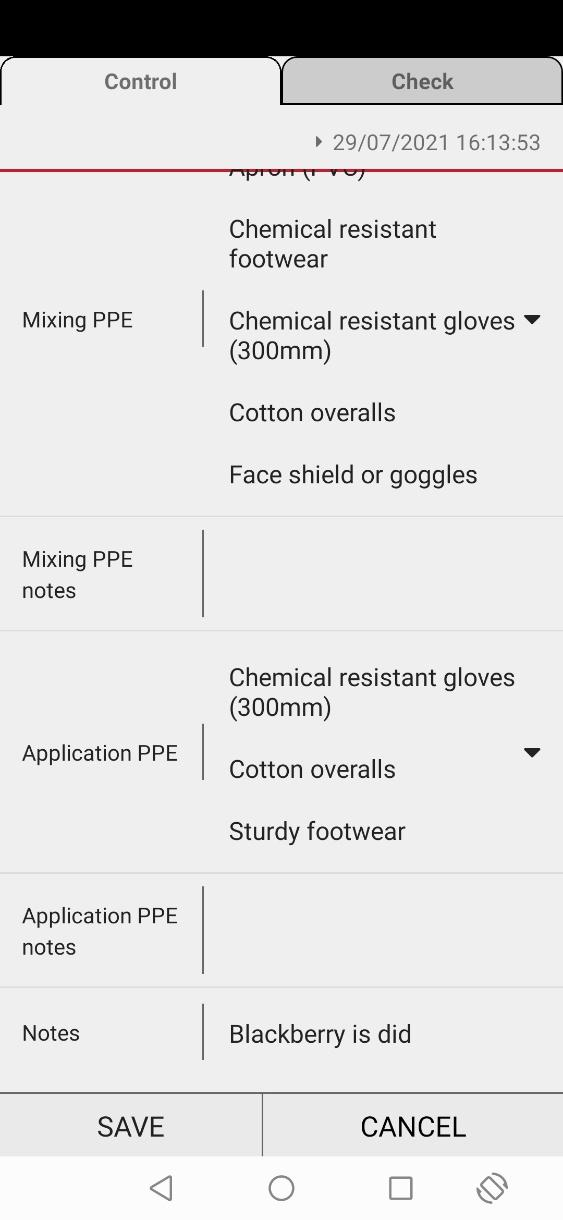
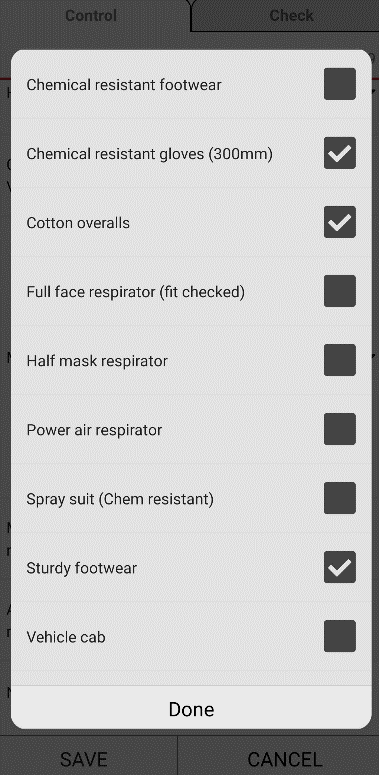
Personal Protective Equipment (PPE)
You can record the PPE you have used when carrying out a chemical control. A drop down list is available for both mixing and application phases of the task. The list is shown below. You can tick none or all of the listed items.
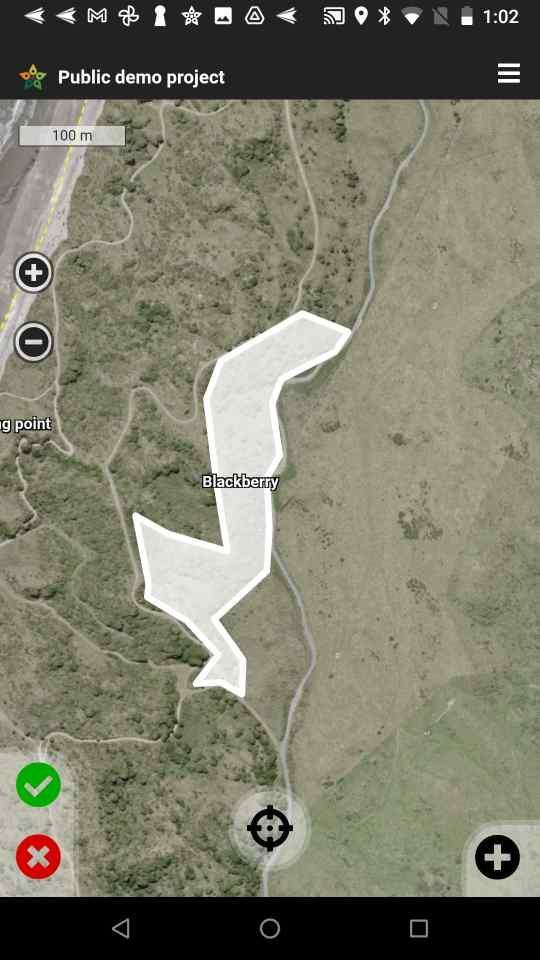
Using the GPS to record weed locations and add a control
This function could be used to prepare a digital spray diary entry out in the field during or after a control has been applied.
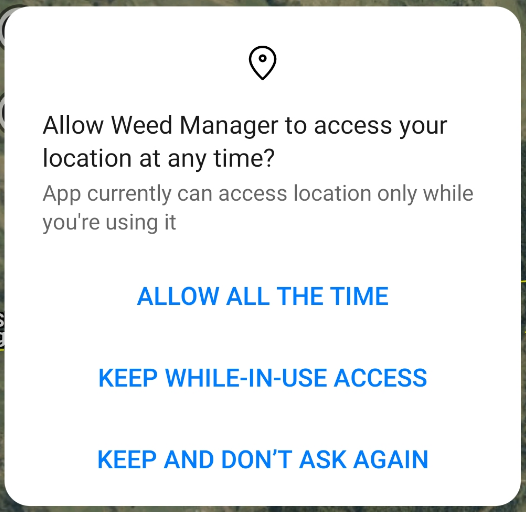
Go to your phone settings and turn “Location” or “GPS” to “on” When you first start Weedmanager you will be asked to allow access to you phone’s location. Tap on the option which suits you (normally the middle one on the right).
The mapping tools are shown to the left. Move close to where you wish to record and maybe control a weed. Clicking the ![]() icon will zoom the project map to your location. When you wish to start recording your location tap the black man on the mapping tools menu.
icon will zoom the project map to your location. When you wish to start recording your location tap the black man on the mapping tools menu. 


![]()
![]() The man will turn green and GPS tracking will be live.
The man will turn green and GPS tracking will be live. 
Once tracking is live you will be able see where you have been. When you want to stop recording your location, tap on the green tick. 
When you tap on the green tick a Weed form will appear on the App. Fill that out, Save and the track will turn yellow. Note that a weed name now appears on the screen as shown on the right. 
Tap on the button (bottom left). The red  and green
  will appear. Select the yellow track by tapping on it. The track will turn white. Tap on the and the Control or Check form will appear for you to fill out. Fill in the control or check details, tap and hold the SAVE button until it turns green. Note that once you been through the process once the App will autofill the next control form.


Privacy Policy
This privacy policy describes how Groundtruth Limited (administrators WEEDMANAGER) deals with your personal information, and how we protect your privacy.
Our commitment to your privacy
We respect your right to privacy and your right to view and update the personal information we hold about you. We are committed to protecting your privacy when you visit our site or contact us in any way.
We will only deal with your personal information in accordance with the Privacy Act 2020 and this privacy policy.
Your personal information
Collecting your personal information
If you access any of our services (including joining a WEEDMANAGER project, supporting our campaigns, contacting us with a business enquiry or signing up for our newsletters), you will need to provide us with some or all of the following personal information:
- Your name.
- Your email address.
- Your residential or postal address.
- Your mobile number.
Collectively, this is known as your “personal information".
Using your personal information
We collect and use your personal information to:
- Provide you with the products and services you sign up for.
- Administer your membership efficiently.
- Allow project administrators to coordinate WEEDMANAGER work.
- Send out emails or newsletters if you have opted-in.
Changing your personal information
You have the right to view and change any personal information we hold about you at any time.
WEEDMANAGER members can do this on WEEDMANAGER by entering your email address and password and updating your “My Account” profile.
Alternatively, you can contact Groundtruth Limited on 04 904 0876 or https://weedmanager.nz/contact
Disclosing your personal information
We will not sell or rent your personal information to any third party.
Project administrators can see the name and email address of any member who has joined their project.
Project and community contributions
Collecting project information
When you create or join a project on WEEDMANAGER you will need to provide some or all of the below information:
- Project name, description, geographic boundaries and contact information.
- Precise locations of Pest plant sites
- Detailed pest plant eradication and photographs).
Collectively, this is known as “project information”.
Disclosing project information
Detailed project information (including, pest plant names, precise locations, notes, photos and “recorded by” fields) is private to project groups and will never be sold or rented.
Project administrators and editors can see precise locations and records for all pest plant sites within their project(s).
Project members can see precise locations and records for all pest plant sites which they have been assigned to.
By default:
- We publicly display project names, descriptions, geographic boundaries and contact details on WEEDMANAGER
- We publicly share summarised project data at a 200m x 200m (4 hectare) grid level. This includes total counts of the types of traps or stations, counts of species caught or detected, strike counts, and baits used. Summarisation does not reveal any personal information or the precise location of any pest plant names/ sites.
Both of these defaults can be changed at any time by project administrators.
Cookies
WEEDMANAGER uses cookies to help us understand how visitors engage with our website. These technologies allow us to:
- Improve our website (for example, identify and provide shortcuts to commonly used functions).
- Provide you with more targeted information where appropriate.
Temporary cookies
We use temporary (per-session) cookies to "remember" that a member has logged in. This means you do not have to enter your email address and password more than once during a visit.
Please note: Our temporary cookies must be accepted to login and access WEEDMANAGER.
Third party cookies and other technologies
We use third-party cookies and other technologies to gather website analytics. This includes Google Analytics cookies to understand how members use our site.
You can opt out of Google Analytics without affecting how you visit our site. For more information on opting out of being tracked by Google Analytics please visit this page.
You can also ask your browser to delete or block third-party cookies: simply search online for “cookies” + the name of your internet browser (for example, “Google Chrome”) for step-by-step instructions.
Contacting you
We may contact you to:
- Clarify details about your membership.
- Respond to any enquiries you make.
- Provide any information necessary for the operation and security of our site.
- If you are a member we may also contact you to advise of changes to our terms and conditions, services or products.
Email communications
All new members will be signed up to automatically receive our email newsletter. You can choose to remove yourself from our newsletter by following the "unsubscribe" prompt at the bottom of each email or by updating your preferences in your “My Account” profile.
More information
Complaints
WEEDMANAGER is committed to dealing quickly and appropriately with any privacy complaints.
If you are concerned this privacy policy may have been breached or your privacy has been compromised, please email us immediately on weedmanager.nz/contact or call us on 04 904 0876.
For more information on privacy see the Privacy Commissioner's website.
Data deletion
There are many reasons you may want to delete your weedmanager account. Whatever they are, you can not delete your own account, this process needs to be undertaken by Groundtruth support.
The first question you need to ask yourself is do I need to delete my account or can I just edit my details, if this is the case, the help document “Editing account details” will help.
Before deleting your account please refer to the following
- You can not delete your WEEDMANAGER account if you are the only administrator of a project. You will need to nominate another project member for this role.
- If you are also wanting to delete projects, you will need to delete any records before being able to delete the project. (this should not be undertaken if there is still a working membership and admin)
- If the project is being retained, any records attached to your account will be retained by WEEDMANAGER for your project records.
- As an administrator you will be able to delete all records in your project, not just your own. (You should not do this if the project is continuing)
- If you are wanting to delete any projects and records of a project, please do this before deleting your WEEDMANAGER account.
- After your account is deleted all your personal details will be removed from WEEDMANAGERr and no longer be available
If you are unsure of any of the above steps or processes contact our support staff
Please be aware we may contact you back to ask further questions
https://weedmanager.nz/contact
Map feeds
Weedmanager provides a range of map feeds in OGC (Open Geospatial Consortium) formats which can be linked directly into GIS tools such as ArcGIS, Google Earth and Google Maps, QuantumGIS etc.
To access the feeds you first need to generate an API key.
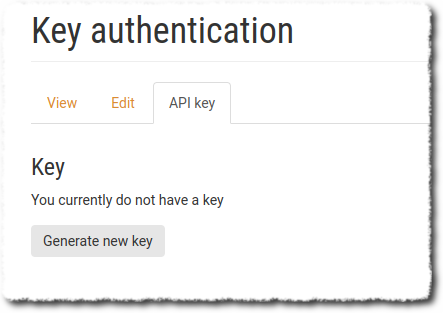
Generating an API key
In the My account section of Weedmanager, you can generate an API key that’s associated with your user account. It can only be used for map feeds (which are read-only), and it can be changed any time by generating a new key, which will disable any previously used keys.
Accessing map feeds
Map feed addresses are in the format:https://io.weedmanager.nz/geo/wm/wfs/apikey/project_id
and https://io.weedmanager.nz/geo/wm/wfs/apikey/project_id
for WFS and WMS feeds respectively.
The Project ID is the last part of the URL when you select your project in Weedmanager.
i.e. when you select the project after logging in, the URL will look something like https://weedmanager.nz/group/123456, and in this case, the Project ID will be 123456.
Note: Some of the map feeds apply to all the projects you are a member of. If you are using those feeds, you still need to select a default project. It doesn’t matter which one.
So for a test user and project the WFS feed looks like this:https://io.weedmanager.nz/geo/wm/wfs/35GElj7FEyGB-gpalO5ptgcEjxmNe7QaOiJNbEPZmSU/123456
(you must generate your own key under the My Account section of the Weedmanager website)
You can paste these URLs into your GIS system and it will show you the available layers.
The layers currently available are:
- default-project-tracks
All tracks from the project specified in the URL - default-project-weeds-all-geometries
All current weeds from the project specified in the URL (combined geometries - only useful for GIS tools that can handle multiple geometry types) - default-project-weeds-linestrings
All current weed lines from the project specified in the URL - default-project-weeds-points
All current weed points from the project specified in the URL - default-project-weeds-polygons
All current weed polygons from the project specified in the URL - default-project-work-areas
Work areas from the project specified intheURL - my-projects-tracks
All tracks from the projects you have access to - my-projects-weeds-all-geometries
All current weeds from from the projects you have access to (combined geometries - only useful for GIS tools that can handle multiple geometry types) - my-projects-weeds-linestrings
All current weed lines from the projects you have access to. - my-projects-weeds-points
All current weed points from the projects you have access to - my-projects-weeds-polygons
All current weed polygons from the projects you have access to - my-projects-work-areas
Work areas from the projects you have access to
Notes
- The WFS server is set to return a maximum of 10k features per page request. Therefore you must set a page size value smaller than that. We suggest 5k to begin with.
Downloading shape files, CSV, linking into Google Earth etc
The map server allows access to WGS 84 and NZTM projections and can also output in many different formats with:
https://io.weedmanager.nz/geo/wm/wfs/apikey/project_id?service=WFS&version=1.0.0&request=GetFeature&typeName=layer&outputFormat=format
Output formats:
|
GML2 |
|
|
GML3 |
|
|
Shapefile |
|
|
JSON |
|
|
JSONP |
|
|
CSV |
|
|
KML |
|
e.g. to get a shapefile of trap locations:
https://io.weedmanager.nz/geo/wm/wfs/apikey/project_id?service=WFS&version=1.0.0&request=GetFeature&typeName=wm:default-project-weeds-points&outputFormat=shape-zip
KML (you can link this directly into Google Earth):
https://io.weedmanager.nz/geo/wm/wfs/apikey/project_id?service=WFS&version=2.0.0&request=GetFeature&typeName=wm:default-project-weeds-points&outputFormat=application/vnd.google-earth.kml+xml
CSV:
https://io.weedmanager.nz/geo/wm/wfs/apikey/project_id?service=WFS&version=2.0.0&request=GetFeature&typeName=wm:default-project-weeds-points&outputFormat=csv
You can also view features directly in OpenLayers:
https://io.weedmanager.nz/geo/wm/wfs/apikey/project_id?service=WMS&version=1.1.0&request=GetMap&layers=wm:default-project-weeds-points&bbox=174.94,-41.5,174.95,-41&width=708&height=768&srs=EPSG:4326&format=application/openlayers
Notes:
The WFS server is set to return a maximum of 10k features per request. If you have more that, you will need to use software (e.g. ArcGIS Pro, or QuantumGIS) to page requests, or include count and startindex parameters . See the WFS specification.
The shapefile format has a number of limitations - see the Geoserver documentation. Datetime fields are not supported - only the date will be included.